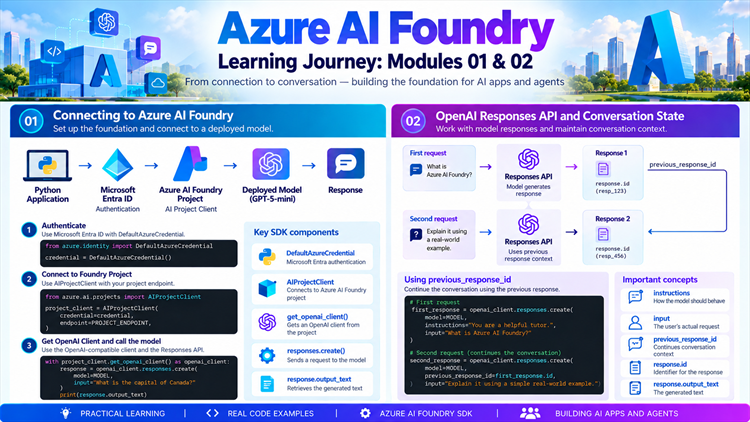
Azure AI Foundry, OpenAI Responses API and Conversation State
AI-103 Learning Journey: Modules 01 and 02
Azure AI Foundry, OpenAI Responses API and Conversation State
As part of my preparation for the Microsoft Azure AI Apps and Agents Developer Associate (AI-103) certification, I am building a practical project rather than relying only on theory.
The goal is to understand how the different Azure AI capabilities fit together and, more importantly, to understand the concepts that are likely to appear in the AI-103 exam.
In the first two modules, I focused on:
-
Connecting to an Azure AI Foundry project
-
Authenticating with Microsoft Entra ID
-
Connecting to a deployed model
-
Using the OpenAI Responses API
-
Understanding model responses
-
Maintaining conversation context between requests
Module 01 — Connecting to Azure AI Foundry
What is Azure AI Foundry?
Azure AI Foundry provides a platform for developing AI applications and agents.
Instead of communicating with an AI model completely independently, an application can connect to an Azure AI Foundry project and use models and AI capabilities managed through that environment.
For my project, I created an Azure AI Foundry project and deployed GPT-5-mini.
The basic architecture is:
Python Application
       |
       | Microsoft Entra ID
       ↓
Azure AI Foundry Project
       |
       ↓
GPT-5-mini Model
       |
       ↓
Response
The important point is that my Python application does not need to directly manage the model infrastructure.
Connecting to the Foundry Project
The first important SDK class I learned was:
AIProjectClient
It is provided by:
from azure.ai.projects import AIProjectClient
I used it to connect my Python application to the Azure AI Foundry project.
The authentication was handled using:
DefaultAzureCredential
from:
from azure.identity import DefaultAzureCredential
The basic connection looked like this:
credential = DefaultAzureCredential()

project_client = AIProjectClient(
    credential=credential,
    endpoint=PROJECT_ENDPOINT,
)
This taught me an important AI-103 concept:
Authentication and the AI service connection are separate concepts.
DefaultAzureCredential handles authentication, while AIProjectClient handles communication with the Azure AI Foundry project.
Environment Variables
Instead of putting configuration directly into the Python code, I stored important values in a .env file.
For example:
FOUNDRY_PROJECT_ENDPOINT=...
FOUNDRY_MODEL=gpt-5-mini
Then Python loads these values using:
from dotenv import load_dotenv
import os

load_dotenv()

PROJECT_ENDPOINT = os.environ["FOUNDRY_PROJECT_ENDPOINT"]
MODEL = os.environ["FOUNDRY_MODEL"]
This is a useful development practice because:
-
configuration is separated from code
-
secrets and endpoints don't need to be hard-coded
-
changing the model doesn't require changing the Python program
Getting an OpenAI Client from the Foundry Project
One of the most useful things I learned in Module 01 was that the project client can provide an OpenAI-compatible client.
I used:
project_client.get_openai_client()
Then I could call the Responses API:
with project_client.get_openai_client() as openai_client:

    response = openai_client.responses.create(
        model=MODEL,
        input="What is the capital of Canada?"
    )

    print(response.output_text)
This introduced another important concept:
AIProjectClient
       ↓
get_openai_client()
       ↓
OpenAI client
       ↓
Responses API
       ↓
Model
The application is therefore using the OpenAI-style API while the model is hosted through the Azure AI Foundry environment.
Module 01 — What I Learned
The main concepts from Module 01 were:
1. Azure AI Foundry Project
A project provides the environment through which my application can access AI capabilities and models.
2. AIProjectClient
AIProjectClient
is the main Azure AI Projects SDK client I used to connect to the Foundry project.
3. DefaultAzureCredential
DefaultAzureCredential()
provides Microsoft Entra-based authentication using the available Azure credential sources.
4. Model Deployment
My application specifies the model/deployment it wants to use:
model=MODEL
5. OpenAI Responses API
The model interaction is performed using:
openai_client.responses.create()
6. output_text
The easiest way to retrieve the generated text is:
response.output_text
Module 02 — OpenAI Responses API and Conversation State
After successfully connecting to the model, the next step was understanding how applications can work with responses and maintain context.
A simple request looks like:
response = openai_client.responses.create(
    model=MODEL,
    input="Explain Azure AI Foundry in simple terms."
)
The model processes the input and returns a response.
This is straightforward when each request is independent.
But real AI applications often need conversations.
For example:
User: What is Azure AI Foundry?

AI: Azure AI Foundry is...

User: Explain it with a real-world example.

AI: ...
The second question depends on the first answer.
This is where conversation state becomes important.
Using previous_response_id
The Responses API provides a way to continue from a previous response.
The first request creates a response:
first_response = openai_client.responses.create(
    model=MODEL,
    instructions="You are an AI-103 tutor. Explain concepts for a beginner.",
    input="What is Azure AI Foundry?"
)
The response contains an ID:
first_response.id
The second request can reference that response:
second_response = openai_client.responses.create(
    model=MODEL,
    previous_response_id=first_response.id,
    input="Explain it using a simple real-world example."
)
The important property here is:
previous_response_id
It allows the new request to continue the previous conversation context.
Why Conversation State Matters
Without conversation context, the second request could be treated as an independent question.
For example:
Request 1:
"What is Azure AI Foundry?"

Request 2:
"Explain it using a simple real-world example."
The second request doesn't explicitly say what "it" means.
With conversation state, the application can maintain the relationship between the two requests.
Conceptually:
Response 1
    |
    | previous_response_id
    ↓
Response 2
    |
    | previous_response_id
    ↓
Response 3
This creates a chain of related interactions.
Instructions vs Input
Another useful concept I learned was the difference between:
instructions=
and:
input=
For example:
response = openai_client.responses.create(
    model=MODEL,
    instructions="You are an AI-103 tutor. Explain concepts for a beginner.",
    input="What is Azure AI Foundry?"
)
Instructions
Instructions define how the model should behave.
For example:
You are an AI-103 tutor.
Explain concepts for a beginner.
Input
Input is the actual request from the user.
For example:
What is Azure AI Foundry?
A useful way to remember this is:
Instructions = How should the AI behave?

Input = What should the AI do?
The Architecture I Understand Now
After Modules 01 and 02, I can now visualize a basic AI application as:
                    Python Application
                           |
                           ↓
                 Microsoft Entra ID
                           |
                           ↓
                  Azure AI Foundry
                           |
                    AIProjectClient
                           |
                    OpenAI Client
                           |
                           ↓
                 Responses API
                           |
                           ↓
                    GPT-5-mini
                           |
                           ↓
                      Response
                           |
                           ↓
                previous_response_id
                           |
                           ↓
                  Next conversation turn
This is a much clearer mental model than simply memorising individual SDK commands.
Important AI-103 Exam Points
For the exam, I would remember these relationships:
| Concept | What to remember |
|---|---|
AIProjectClient |
Connects application to Azure AI Foundry project |
DefaultAzureCredential |
Microsoft Entra-based authentication |
get_openai_client() |
Gets an OpenAI client from the Foundry project client |
responses.create() |
Sends a request to the model |
model |
Specifies the model/deployment |
input |
User/application request |
instructions |
Behaviour/instructions for the model |
response.output_text |
Gets generated text |
response.id |
Identifier for a response |
previous_response_id |
Continues a previous response/conversation |
Common Exam Traps
Trap 1 — Authentication vs Client
Don't confuse:
DefaultAzureCredential()
with:
AIProjectClient()
The first handles authentication.
The second is the project client.
Trap 2 — Model vs API
GPT-5-mini is the model.
responses.create() is the API operation used to send the request.
They are not the same thing.
Trap 3 — Instructions vs Input
instructions=
controls the model's behaviour.
input=
contains the actual task/request.
Trap 4 — Conversation Context
If a question asks how to continue a previous response using the Responses API, remember:
previous_response_id
Trap 5 — output_text
When the question asks how to retrieve the generated text from a response, remember:
response.output_text
What I Can Now Do
After completing Modules 01 and 02, I can now create a basic AI application that:
-
Connects to an Azure AI Foundry project.
-
Authenticates using Microsoft Entra ID.
-
Accesses a deployed model.
-
Sends prompts using the Responses API.
-
Reads the generated response.
-
Provides model instructions.
-
Continues a conversation using response IDs.
This forms the foundation for the more advanced AI-103 topics that come next.
The next modules will build on this foundation by introducing agents, tools, workflows, MCP, RAG, document processing, vision, speech, translation, content safety and evaluation.
My AI-103 Learning Principle
The biggest lesson from these first two modules is that I should not learn Azure AI only by memorising code.
I need to understand the architecture:
Authentication
      ↓
Azure AI Foundry Project
      ↓
Client
      ↓
Model
      ↓
API
      ↓
Response
      ↓
Conversation State
Once this architecture is clear, the individual SDK classes and methods become much easier to understand.
That foundation will be important as I move from simple model calls → agents → tools → workflows → complete AI applications.
Thanks, for reading the blog, I hope it helps you. Please share this link on your social media accounts so that others can read our valuable content. Share your queries with our expert team and get Free Expert Advice for Your Business today.